
Forgejo Runner installation guide
The Forgejo Runner is a daemon that fetches workflows to run from a Forgejo instance, executes them, sends back with the logs and ultimately reports its success or failure.
It needs to be installed separately from the main Forgejo instance. For security reasons it is not recommended to install the runner on the same machine as the main instance.
Each Forgejo Runner release is published for all supported architectures as:
Binary installation
System requirements
Forgejo Runner requires that Git is installed, and has been tested with a minimum version of Git 2.24.3.
Downloading and installing the binary
Download the latest binary release and verify its signature:
$ export ARCH=$(uname -m | sed 's/x86_64/amd64/;s/aarch64/arm64/')
$ export RUNNER_VERSION=$(curl -X 'GET' https://data.forgejo.org/api/v1/repos/forgejo/runner/releases/latest | jq .name -r | cut -c 2-)
$ export FORGEJO_URL="https://code.forgejo.org/forgejo/runner/releases/download/v${RUNNER_VERSION}/forgejo-runner-${RUNNER_VERSION}-linux-${ARCH}"
$ wget -O forgejo-runner ${FORGEJO_URL} || curl -o forgejo-runner ${FORGEJO_URL}
$ chmod +x forgejo-runner
$ wget -O forgejo-runner.asc ${FORGEJO_URL}.asc || curl -o forgejo-runner.asc ${FORGEJO_URL}.asc
$ gpg --keyserver hkps://keys.openpgp.org --recv EB114F5E6C0DC2BCDD183550A4B61A2DC5923710
$ gpg --verify forgejo-runner.asc forgejo-runner && echo "✓ Verified" || echo "✗ Failed"
Good signature from "Forgejo <contact@forgejo.org>"
		aka "Forgejo Releases <release@forgejo.org>"
✓ Verified
Next, copy the downloaded binary to /usr/local/bin and make it executable:
$ cp forgejo-runner /usr/local/bin/forgejo-runnerYou should now be able to test the runner by running forgejo-runner -v:
$ forgejo-runner -v
forgejo-runner version v9.0.3
Setting up the runner user
Set up the user to run the daemon:
$ useradd --create-home runnerIf the runner will be using Docker (or rootful Podman through the Docker shim), ensure the runner user had access to the docker/podman socket.
If you are using Docker, run:
$ usermod -aG docker runnerSetting up the container environment
The Forgejo runner relies on application containers (Docker, Podman, etc.) or system containers (LXC) to execute a workflow in an isolated environment. They need to be installed and configured independently.
It is common for workflows to also require interaction with a container environment, for example to execute docker build commands. This is distinct from how Forgejo Runner itself executes jobs, and is an optional configuration that is described in detail in Utilizing Docker within Actions.
-
Docker: See the Docker installation documentation for more information.
-
Podman: Podman provides a (generally compatible) Docker CLI and Socket. Depending on your distribution, you may need to install an additional package (e.g.
podman-dockerfor Ubuntu). The socket is not enabled by default and must be enabled. If it is not, the Forgejo runner complains about “daemon Docker Engine socket not found”, or “cannot ping the docker daemon”. On systemd-based distributions, there is a systemd unit available which can be enabledsystemctl enable --now podman.socket. To use rootless podman for the socket, runsystemctl --user enable --now podman.socketas the runner user.On non-systemd distributions, the podman socket can be provided by running
podman system service -t 0in the background.The location of the podman socket must be passed to the Forgejo runner using the
DOCKER_HOSTenvironment variable.$ DOCKER_HOST=unix://${XDG_RUNTIME_DIR}/podman/podman.sock ./forgejo-runner daemon -
LXC: For jobs to run in LXC containers, the
Forgejo runnerneeds passwordless sudo access for alllxc-*commands on a Debian GNU/Linuxbookwormsystem where LXC is installed. The LXC helpers can be used as follows to create a suitable container:$ git clone https://code.forgejo.org/forgejo/lxc-helpers $ sudo cp -a lxc-helpers/lxc-helpers{,-lib}.sh /usr/local/bin $ lxc-helpers.sh lxc_container_create myrunner $ lxc-helpers.sh lxc_container_start myrunner $ lxc-helpers.sh lxc_container_user_install myrunner 1000 debianNOTE: Multiarch Go builds and binfmt need
bookwormto produce and test binaries on a single machine for people who do not have access to dedicated hardware.The
Forgejo runnercan then be installed and run within themyrunnercontainer.$ lxc-helpers.sh lxc_container_run forgejo-runners -- sudo --user debian bash $ sudo apt-get install docker.io wget gnupg2 $ wget -O forgejo-runner https://code.forgejo.org/forgejo/runner/releases/download/v9.0.3/forgejo-runner-9.0.3-linux-amd64 ...Warning: LXC containers do not provide a level of security that makes them safe for potentially malicious users to run jobs. They provide an excellent isolation for jobs that may accidentally damage the system they run on.
-
Host: There is no requirement for jobs that run directly on the host.
Warning: there is no isolation at all and a single job can permanently destroy the host.
Warning: processes forked out of a job may linger after the job is complete, possibly forever, if the job fails to wait for them to complete.
Registering the runner
To receive tasks from the Forgejo instance, the runner needs to be registered.
To register the runner, switch user to the runner user account, and return to the home directory:
$ sudo su runner
$ whoami
runner
$ cd ~
$ pwd
/home/runner
From here, follow the registration instructions.
Configuration
The default configuration for the runner can be
displayed with forgejo-runner generate-config, stored in a
config.yml file, modified and used instead of the default with the
--config flag.
$ forgejo-runner generate-config > config.yml
# Example configuration file, it's safe to copy this as the default config file without any modification.

# You don't have to copy this file to your instance,
# just run `forgejo-runner generate-config > config.yaml` to generate a config file.

#
# The value of level or job_level can be trace, debug, info, warn, error or fatal
#
log:
  #
  # What is displayed in the output of the runner process but not sent
  # to the Forgejo instance.
  #
  level: info
  #
  # What is sent to the Forgejo instance and therefore
  # visible in the web UI for a given job.
  #
  job_level: info

runner:
  # Where to store the registration result.
  file: .runner
  # Execute how many tasks concurrently at the same time.
  capacity: 1
  # Extra environment variables to run jobs.
  envs:
    A_TEST_ENV_NAME_1: a_test_env_value_1
    A_TEST_ENV_NAME_2: a_test_env_value_2
  # Extra environment variables to run jobs from a file.
  # It will be ignored if it's empty or the file doesn't exist.
  env_file: .env
  # The timeout for a job to be finished.
  # Please note that the Forgejo instance also has a timeout (3h by default) for the job.
  # So the job could be stopped by the Forgejo instance if it's timeout is shorter than this.
  timeout: 3h
  # The timeout for the runner to wait for running jobs to finish when
  # shutting down because a TERM or INT signal has been received.  Any
  # running jobs that haven't finished after this timeout will be
  # cancelled.
  # If unset or zero the jobs will be cancelled immediately.
  shutdown_timeout: 3h
  # Whether skip verifying the TLS certificate of the instance.
  insecure: false
  # The timeout for fetching the job from the Forgejo instance.
  fetch_timeout: 5s
  # The interval for fetching the job from the Forgejo instance.
  fetch_interval: 2s
  # The interval for reporting the job status and logs to the Forgejo instance.
  report_interval: 1s
  # The labels of a runner are used to determine which jobs the runner can run, and how to run them.
  # Like: ["macos-arm64:host", "ubuntu-latest:docker://node:20-bookworm", "ubuntu-22.04:docker://node:20-bookworm"]
  # If it's empty when registering, it will ask for inputting labels.
  # If it's empty when executing the `daemon`, it will use labels in the `.runner` file.
  labels: []

cache:
  #
  # When enabled, workflows will be given the ACTIONS_CACHE_URL environment variable
  # used by the https://code.forgejo.org/actions/cache action. The server at this
  # URL must implement a compliant REST API and it must also be reachable from
  # the container or host running the workflows.
  #
  # See also https://forgejo.org/docs/next/user/actions/advanced-features/#cache
  #
  # When it is not enabled, none of the following options apply.
  #
  # It works as follows:
  #
  # - the workflow is given a one time use ACTIONS_CACHE_URL
  # - a cache proxy listens to ACTIONS_CACHE_URL
  # - the cache proxy securely communicates with the cache server using
  #   a shared secret
  #
  enabled: true
  #
  #######################################################################
  #
  # Only used for the internal cache server.
  #
  # If external_server is not set, the Forgejo runner will spawn a
  # cache server that will be used by the cache proxy.
  #
  #######################################################################
  #
  # The port bound by the internal cache server.
  # 0 means to use a random available port.
  #
  port: 0
  #
  # The directory to store the cache data.
  #
  # If empty, the cache data will be stored in $HOME/.cache/actcache.
  #
  dir: ""
  #
  #######################################################################
  #
  # Only used for the external cache server.
  #
  # If external_server is set, the internal cache server is not
  # spawned.
  #
  #######################################################################
  #
  # The URL of the cache server. The URL should generally end with
  # "/". The cache proxy will forward requests to the external
  # server. The requests are authenticated with the "secret" that is
  # shared with the external server.
  #
  external_server: ""
  #
  # The shared cache secret used to secure the communications between
  # the cache proxy and the cache server.
  #
  # If empty, it will be generated to a new secret automatically when
  # the server starts and it will stay the same until it restarts.
  #
  secret: ""
  #
  #######################################################################
  #
  # Common to the internal and external cache server
  #
  #######################################################################
  #
  # The IP or hostname (195.84.20.30 or example.com) to use when constructing
  # ACTIONS_CACHE_URL which is the URL of the cache proxy.
  #
  # If empty it will be detected automatically.
  #
  # If the containers or host running the workflows reside on a
  # different network than the Forgejo runner (for instance when the
  # docker server used to create containers is not running on the same
  # host as the Forgejo runner), it may be impossible to figure that
  # out automatically. In that case you can specify which IP or
  # hostname to use to reach the internal cache server created by the
  # Forgejo runner.
  #
  host: ""
  #
  # The port bound by the internal cache proxy.
  # 0 means to use a random available port.
  #
  proxy_port: 0
  #
  # Overrides the ACTIONS_CACHE_URL variable passed to workflow
  # containers. The URL should generally not end with "/". This should only
  # be used if the runner host is not reachable from the workflow containers,
  # and requires further setup.
  #
  actions_cache_url_override: ""

container:
  # Specifies the network to which the container will connect.
  # Could be host, bridge or the name of a custom network.
  # If it's empty, create a network automatically.
  network: ""
  # Whether to create networks with IPv6 enabled. Requires the Docker daemon to be set up accordingly.
  # Only takes effect if "network" is set to "".
  enable_ipv6: false
  # Whether to use privileged mode or not when launching task containers (privileged mode is required for Docker-in-Docker).
  privileged: false
  # And other options to be used when the container is started (eg, --volume /etc/ssl/certs:/etc/ssl/certs:ro).
  options:
  # The parent directory of a job's working directory.
  # If it's empty, /workspace will be used.
  workdir_parent:
  # Volumes (including bind mounts) can be mounted to containers. Glob syntax is supported, see https://github.com/gobwas/glob
  # You can specify multiple volumes. If the sequence is empty, no volumes can be mounted.
  # For example, if you only allow containers to mount the `data` volume and all the json files in `/src`, you should change the config to:
  # valid_volumes:
  #   - data
  #   - /etc/ssl/certs
  # If you want to allow any volume, please use the following configuration:
  # valid_volumes:
  #   - '**'
  valid_volumes: []
  # Overrides the docker host set by the DOCKER_HOST environment variable, and mounts on the job container.
  # If "-" or "", no docker host will be mounted in the job container
  # If "automount", an available docker host will automatically be found and mounted in the job container (e.g. /var/run/docker.sock).
  # If it's a url, the specified docker host will be mounted in the job container
  # Example urls: unix:///run/docker.socket or ssh://user@host
  # The specified socket is mounted within the job container at /var/run/docker.sock
  docker_host: "-"
  # Pull docker image(s) even if already present
  force_pull: false
  # Rebuild local docker image(s) even if already present
  force_rebuild: false

host:
  # The parent directory of a job's working directory.
  # If it's empty, $HOME/.cache/act/ will be used.
  workdir_parent:
Note: container.docker_host = "automount" is only available for
forgejo-runner >= 5.0.3. For forgejo-runner < 5.0.3, it must be explicitly
set to an empty string.
Note: container.force_rebuild is only available for
forgejo-runner >= 6.1.0. For forgejo-runner < 6.1.0, it defaults to false
Cache configuration
Some actions such as https://data.forgejo.org/actions/cache or
https://data.forgejo.org/actions/setup-go can communicate with the
Forgejo runner to save and restore commonly used files such as
compilation dependencies. They are stored as compressed tar archives,
fetched when a job starts and saved when it completes.
If the machine has a fast disk, uploading the cache when the job starts may significantly reduce the bandwidth required to download and rebuild dependencies.
If the machine on which the Forgejo runner is running has a slow
disk and plenty of CPU and bandwidth, it may be better to not activate
the cache as it can slow down the execution time.
For more information see the cache section of
the runner configuration file.
Starting the runner
After the runner has been registered, it can be started by running forgejo-runner daemon as the runner user, in the home directory:
$ whoami
runner
$ pwd
/home/runner
$ forgejo-runner daemon
INFO[2024-09-14T19:19:14+02:00] Starting runner daemon
Running as a systemd service
To automatically start the runner when the system starts, copy this file to /etc/systemd/system/forgejo-runner.service.
Then run systemctl daemon-reload to reload the unit files. Run systemctl start forgejo-runner.service to test the new service. If everything works, run systemctl enable forgejo-runner.service to enable auto-starting the service on boot.
Use journalctl -u forgejo-runner.service to read the runner logs.
OCI image installation
The OCI images
are built from the Dockerfile which is found in the source directory. It contains the forgejo-runner binary.
$ docker run --rm data.forgejo.org/forgejo/runner:11 forgejo-runner --version
forgejo-runner version v11.0.0
It does not run as root:
$ docker run --rm data.forgejo.org/forgejo/runner:11 id
uid=1000 gid=1000 groups=1000
One way to run the Docker image is via Docker Compose. To do so, as root, first prepare a data directory with non-root permissions (in this case, we pick 1001:1001):
#!/usr/bin/env bash

set -e

mkdir -p data/.cache

chown -R 1001:1001 data
chmod 775 data/.cache
chmod g+s data/.cache
After running this script with bash setup.sh, define the following docker-compose.yml:
version: '3.8'

services:
  docker-in-docker:
    image: docker:dind
    container_name: 'docker_dind'
    privileged: 'true'
    command: ['dockerd', '-H', 'tcp://0.0.0.0:2375', '--tls=false']
    restart: 'unless-stopped'

  runner:
    image: 'data.forgejo.org/forgejo/runner:11'
    links:
      - docker-in-docker
    depends_on:
      docker-in-docker:
        condition: service_started
    container_name: 'runner'
    environment:
      DOCKER_HOST: tcp://docker-in-docker:2375
    # User without root privileges, but with access to `./data`.
    user: 1001:1001
    volumes:
      - ./data:/data
    restart: 'unless-stopped'

    command: '/bin/sh -c "while : ; do sleep 1 ; done ;"'
Here, we’re not running the forgejo-runner daemon yet because we need to configure and register it first. Please note that in a recent install of docker docker-compose is not a separate command but should be run as docker compose.
To configure and register the runner, start the runner service with docker-compose up -d and enter it via:
docker exec -it runner /bin/shIn this shell, run the command forgejo-runner generate-config > config.yml to create a configuration file with default settings.
You can then edit the configuration file config.yml.
Also, see the configuration section above for configuration settings.
In the same shell, run the forgejo-runner register command to register the runner and follow the registration instructions below.
After that is done, take the service down again with docker-compose down and modify the command to:
command: '/bin/sh -c "sleep 5; forgejo-runner daemon --config config.yml"'Here, the sleep allows the docker-in-docker service to start up before the forgejo-runner daemon is started.
More docker compose examples are provided to demonstrate how to install the OCI image to successfully run a workflow.
Standard registration
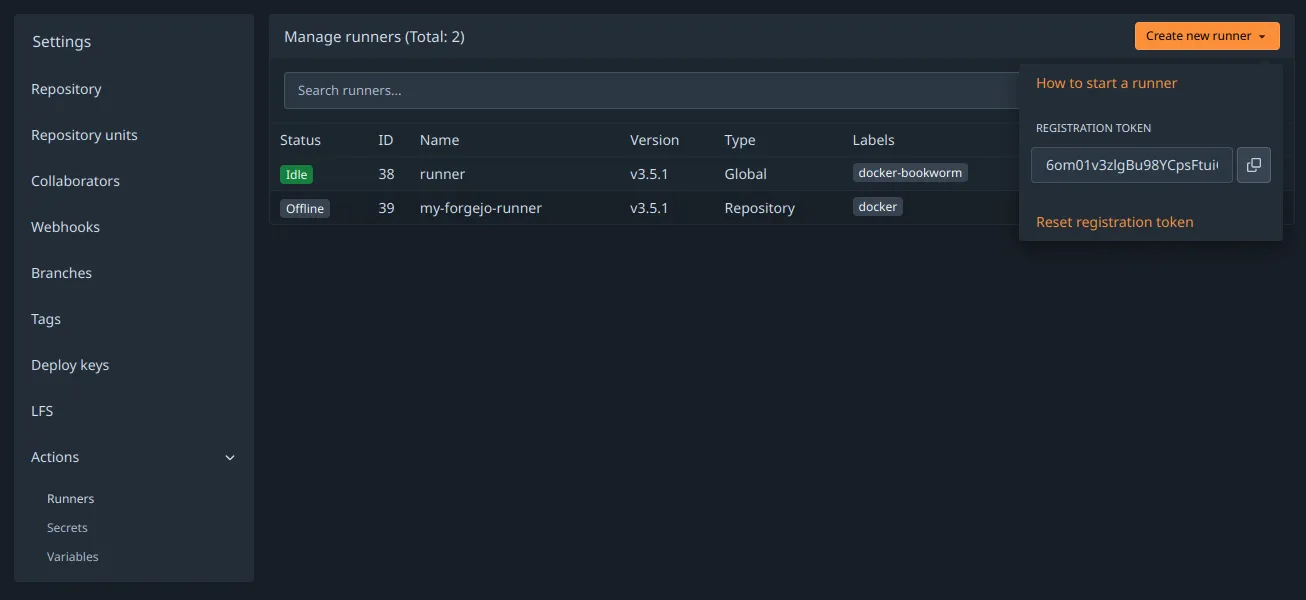
The Forgejo runner needs to connect to a Forgejo instance and must be registered before doing so. It will give it permission to read the repositories and send back information to Forgejo such as the logs or its status.
A special kind of token is needed and can be obtained from the Create new runner button:
- in
/admin/actions/runnersto accept workflows from all repositories. - in
/org/{org}/settings/actions/runnersto accept workflows from all repositories within the organization. - in
/user/settings/actions/runnersto accept workflows from all repositories of the logged in user - in
/{owner}/{repository}/settings/actions/runnersto accept workflows from a single repository.
To register the runner, execute forgejo-runner register and fill in the prompts. For example:
$ forgejo-runner register
INFO Registering runner, arch=arm64, os=linux, version=v9.0.3.
WARN Runner in user-mode.
INFO Enter the Forgejo instance URL (for example, https://next.forgejo.org/):
https://code.forgejo.org/
INFO Enter the runner token:
6om01axzegBu98YCpsFtda4Go2DuJe7BEepzz2F3HY
INFO Enter the runner name (if set empty, use hostname: runner-host):
my-forgejo-runner
INFO Enter the runner labels, leave blank to use the default labels (comma-separated, for example, ubuntu-20.04:docker://node:20-bookworm,ubuntu-18.04:docker://node:20-bookworm):

INFO Registering runner, name=my-forgejo-runner, instance=https://code.forgejo.org/, labels=[docker:docker://node:20-bookworm].
DEBU Successfully pinged the Forgejo instance server
INFO Runner registered successfully.
This will create a .runner file in the current directory that looks like:
{
  "WARNING": "This file is automatically generated by act-runner. Do not edit it manually unless you know what you are doing. Removing this file will cause act runner to re-register as a new runner.",
  "id": 42,
  "uuid": "d2ax6368-9c20-4dy0-9a5a-e09c53854zb5",
  "name": "my-forgejo-runner",
  "token": "864e6019009e1635d98adf3935b305d32494d42a",
  "address": "https://code.forgejo.org/",
  "labels": ["docker:docker://node:20-bookworm"]
}
To decide which labels to use, see Choosing labels.
The same token can be used multiple times to register any number of runners, independent of each other.
Offline registration
When Infrastructure as Code (Ansible, kubernetes, etc.) is used to deploy and configure both Forgejo and the Forgejo runner, it may be more convenient for it to generate a secret and share it with both.
The forgejo forgejo-cli actions register --secret <secret> subcommand can be used to register the runner with the Forgejo instance and the forgejo-runner create-runner-file --secret <secret> subcommand can be used to configure the Forgejo runner with the credentials that will allow it to start picking up tasks from the Forgejo instances as soon as it comes online.
For instance, on the machine running Forgejo:
$ forgejo forgejo-cli actions register --name runner-name --scope myorganization \
    --secret 7c31591e8b67225a116d4a4519ea8e507e08f71f
and on the machine on which the Forgejo runner is installed:
$ forgejo-runner create-runner-file --instance https://example.conf \
        --secret 7c31591e8b67225a116d4a4519ea8e507e08f71f
The secret must be a 40-character long string of hexadecimal numbers. The first 16 characters will be used as an identifier for the runner, while the rest is the actual secret. It is possible to update the secret of an existing runner by running the command again on the Forgejo machine, with the last 24 characters updated.
For instance, the command below would change the secret set by the previous command:
$ forgejo forgejo-cli actions register --name runner-name --scope myorganization \
    --secret 7c31591e8b67225a84e8e06633b9578e793664c3
#              ^^^^^^^^^^^^^^^^ This part is identical
The registration command on the Forgejo side is mostly idempotent, with the exception of the runner labels. If the command is run without --labels, they will be reset, and the runner won’t set them back until it is restarted. The --keep-labels option can be used to preserve the existing labels.
Enabling IPv6 in Docker & Podman networks
When a Forgejo runner creates its own Docker or Podman networks, IPv6 is not enabled by default, and must be enabled explicitly in the Forgejo runner configuration.
Docker only: The Docker daemon requires additional configuration to enable IPv6. To make use of IPv6 with Docker, you need to provide a /etc/docker/daemon.json configuration file with at least the following keys:
{
  "ipv6": true,
  "experimental": true,
  "ip6tables": true,
  "fixed-cidr-v6": "fd00:d0ca:1::/64",
  "default-address-pools": [
    { "base": "172.17.0.0/16", "size": 24 },
    { "base": "fd00:d0ca:2::/104", "size": 112 }
  ]
}
Afterwards restart the Docker daemon with systemctl restart docker.service.
NOTE: These are example values. While this setup should work out of the box, it may not meet your requirements. Please refer to the Docker documentation regarding enabling IPv6 and allocating IPv6 addresses to subnets dynamically.
Docker & Podman:
To test IPv6 connectivity in Forgejo runner-created networks, create a small workflow such as the following:
---
on: push
jobs:
  ipv6:
    runs-on: docker
    steps:
      - run: |
          apt update; apt install --yes curl
          curl -s -o /dev/null http://ipv6.google.com
If you run this action with forgejo-runner exec, you should expect this job fail:
$ forgejo-runner exec
...
| curl: (7) Couldn't connect to server
[ipv6.yml/ipv6]   ❌  Failure - apt update; apt install --yes curl
curl -s -o /dev/null http://ipv6.google.com
[ipv6.yml/ipv6] exitcode '7': failure
[ipv6.yml/ipv6] Cleaning up services for job ipv6
[ipv6.yml/ipv6] Cleaning up container for job ipv6
[ipv6.yml/ipv6] Cleaning up network for job ipv6, and network name is: FORGEJO-ACTIONS-TASK-push_WORKFLOW-ipv6-yml_JOB-ipv6-network
[ipv6.yml/ipv6] 🏁  Job failed
To actually enable IPv6 with forgejo-runner exec, the flag --enable-ipv6 must be provided. If you run this again with forgejo-runner exec --enable-ipv6, the job should succeed:
$ forgejo-runner exec --enable-ipv6
...
[ipv6.yml/ipv6]   ✅  Success - Main apt update; apt install --yes curl
curl -s -o /dev/null http://ipv6.google.com
[ipv6.yml/ipv6] Cleaning up services for job ipv6
[ipv6.yml/ipv6] Cleaning up container for job ipv6
[ipv6.yml/ipv6] Cleaning up network for job ipv6, and network name is: FORGEJO-ACTIONS-TASK-push_WORKFLOW-ipv6-yml_JOB-ipv6-network
[ipv6.yml/ipv6] 🏁  Job succeeded
Finally, if this test was successful, enable IPv6 in the config.yml file of the Forgejo runner daemon and restart the daemon:
container:
  enable_ipv6: true
Now, Forgejo runner will create networks with IPv6 enabled, and workflow containers will be assigned addresses from the pools defined in the Docker daemon configuration.
IPv6 connectivity issues with rootless podman
Because creation of real networks is limited to the root user, rootless podman cannot create actual networks.
To work around this issue, podman creates so-called tap-networks which come with their own limitations.
At the time of writing, only Podman version 5.3 and later have been observed to have proper IPv6 support in rootless bridge networks.
Podman 5 switched to passt for rootless networking and 5.3 includes fixes like host-service reachability.
(Earlier versions appear to cause “host unreachable” or “network unreachable” issues with bridge networks - which is the type Forgejo runners create.)
Packaging
NixOS
A forgejo-runner package is available for Nix.
As NixOS service module services.gitea-actions-runner.* can be used.
If application containers are to be used (Docker or Podman), one of virtualisation.docker.enable or virtualisation.podman.enable must also be set to true.
An example service definition might look like this:
services.gitea-actions-runner = {
  package = pkgs.forgejo-runner;
  instances.my-forgejo-instance = {
    enable = true;
    name = "my-forgejo-runner-01";
    token = "<registration-token>";
    url = "https://code.forgejo.org/";
    labels = [
      "node-22:docker://node:22-bookworm"
      "nixos-latest:docker://nixos/nix"
    ];
    settings = { ... };
  };
The runner configuration can be specified in services.gitea-actions-runner.instances.<instance>.settings as per Configuration.
IPv6 support is not enabled by default for docker. The following snippet enables this.
virtualisation.docker = {
  daemon.settings = {
    fixed-cidr-v6 = "fd00::/80";
    ipv6 = true;
  };
};
If you would like to use docker runners in combination with cache actions, be sure to add docker bridge interfaces “br-*” to the firewalls’ trusted interfaces:
networking.firewall.trustedInterfaces = [ "br-+" ];