
Your First Repository
Almost everything on Forgejo happens in a repository. Think of a repository as a home for your project, where all of its source code can be organized using Git, as well as where you can track issues and read and write wikis.
This article will guide you through creating your first repository on Forgejo, connecting your local development environment and making your first commit.
Creating a Repository
To create a new repository, you need be logged in to your account.
When you’re logged in, you can use one of the two buttons shown in the two following screenshots to create a new repository:
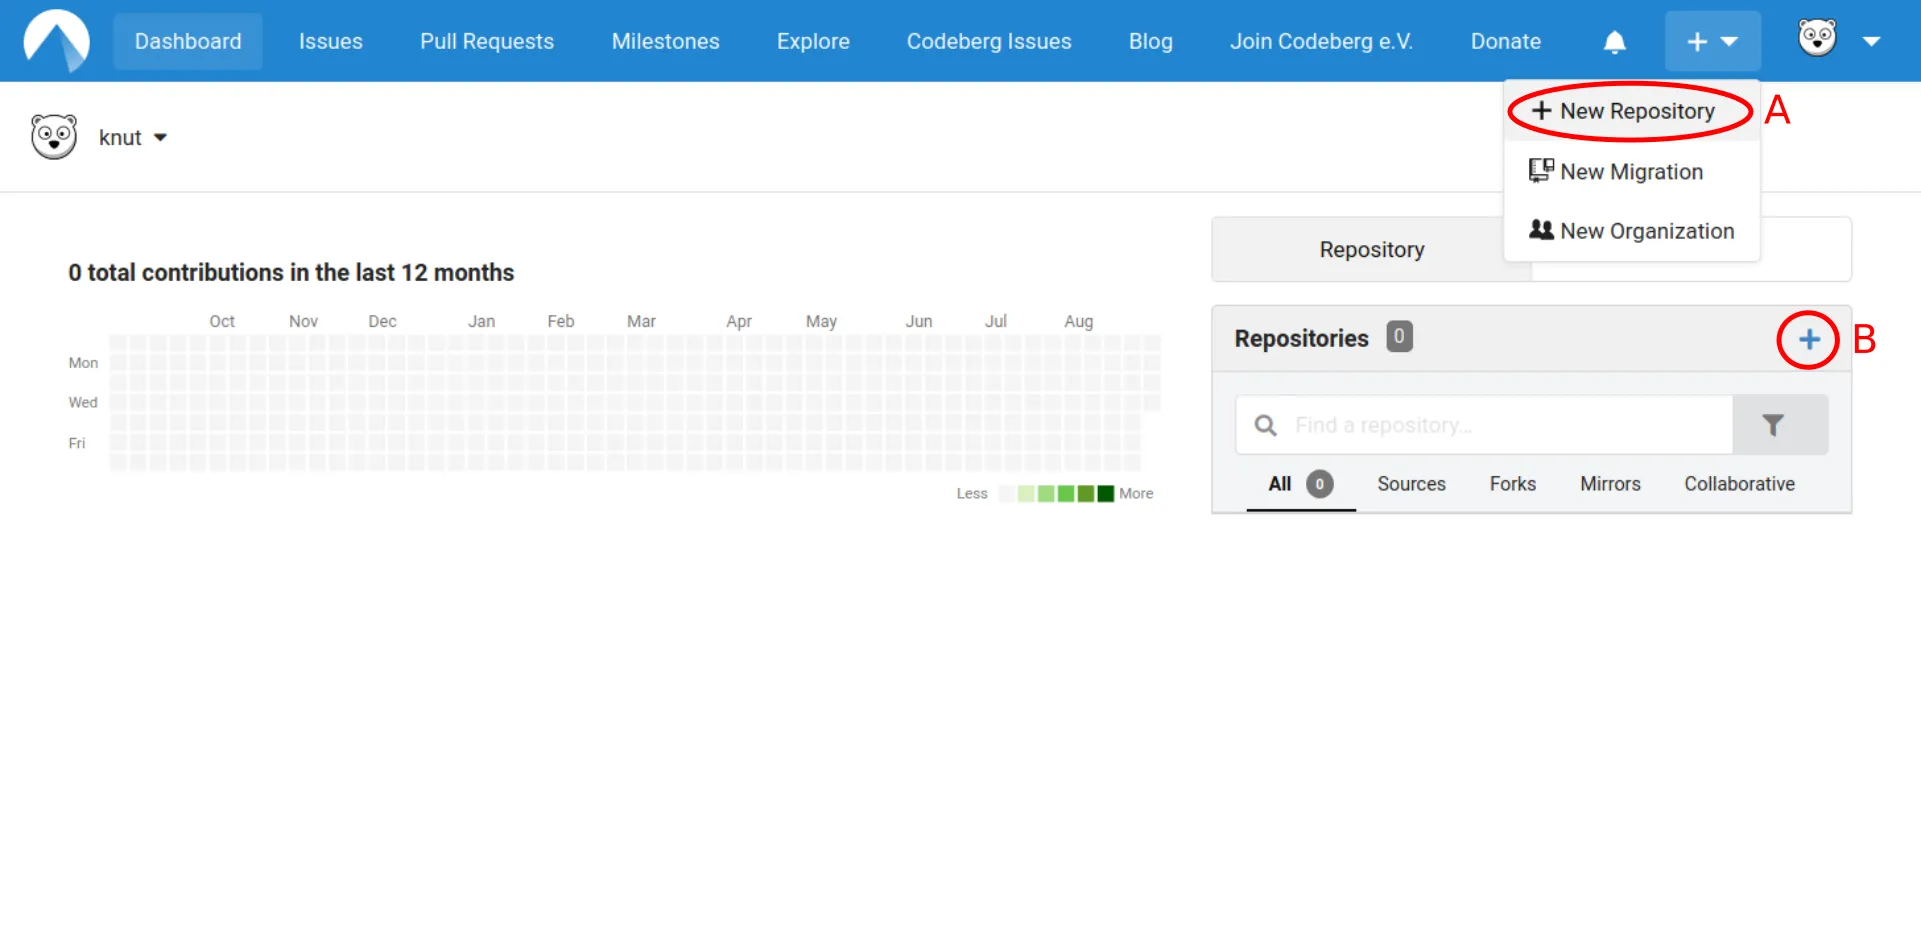
This will lead you to this page below.
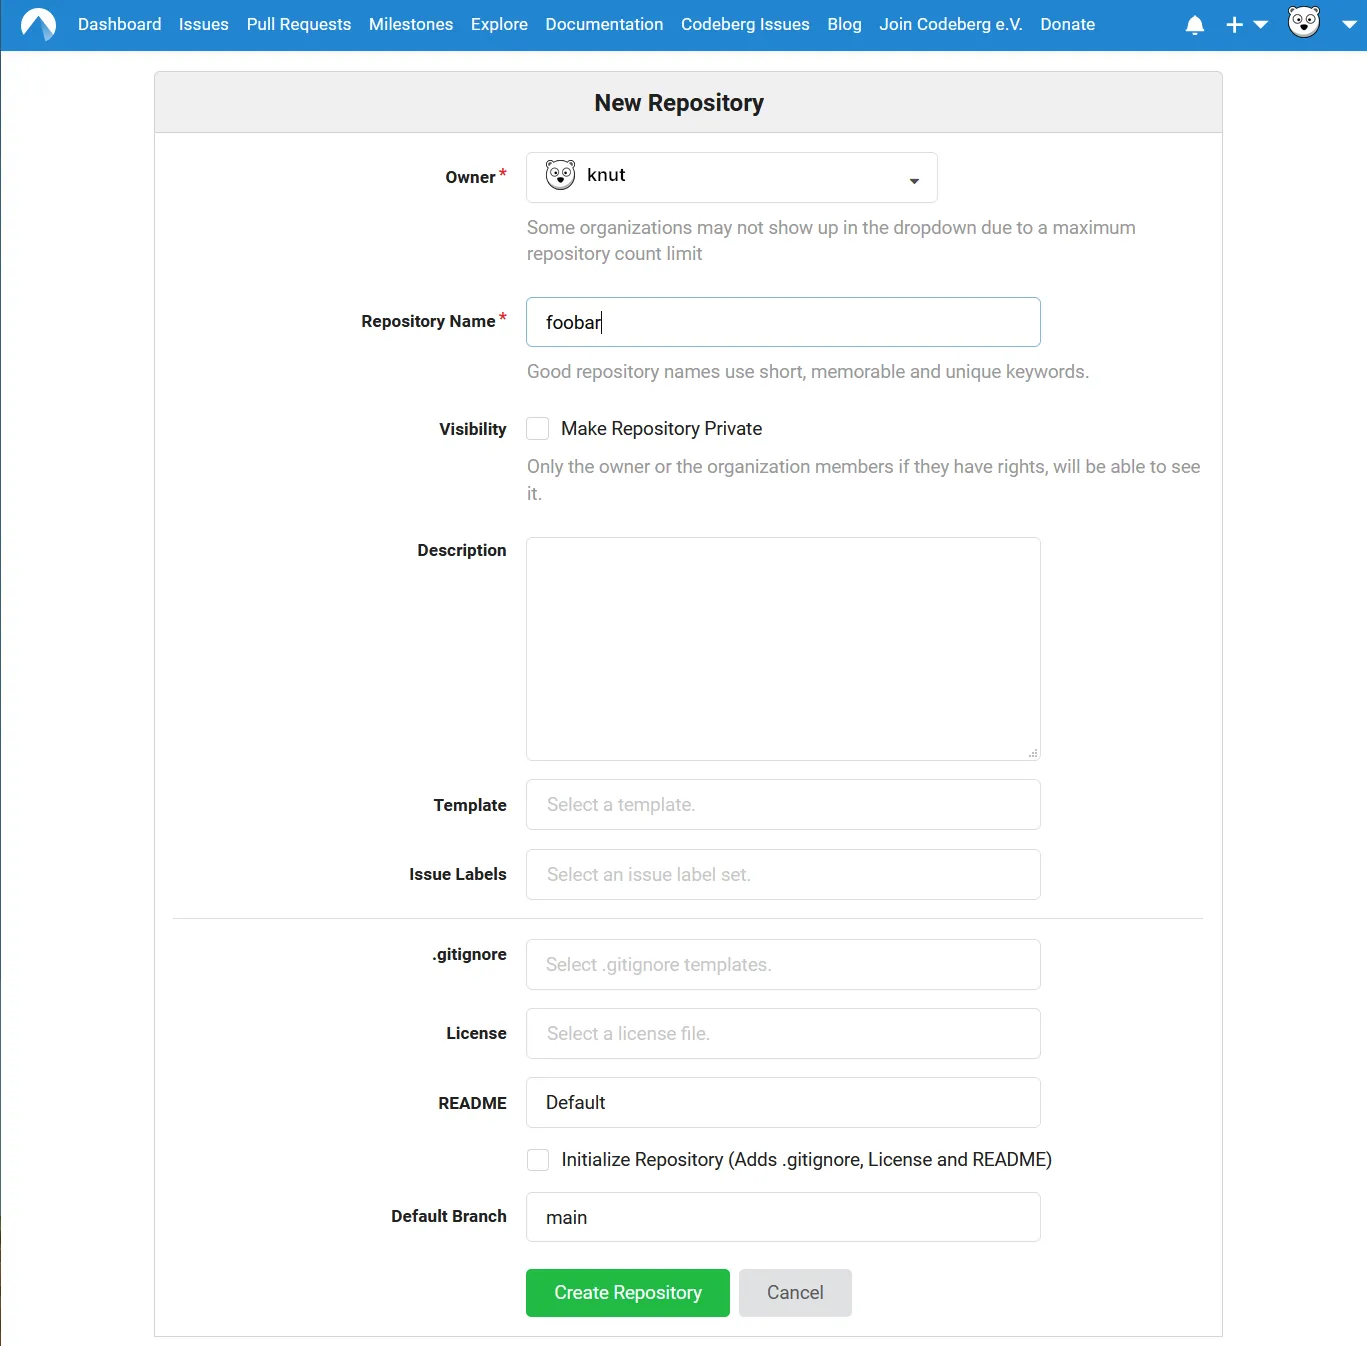
Here’s an explanation of the form’s fields:
- Owner Here, you can specify whether you want this to be your own personal project or whether you want it to be part of an organization that you’re a part of
- Repository name A name for your repository (which will also be part of its path, in this case
https://codeberg.org/knut/foobar) - Visibility Repositories are either public or private, where public means that everyone will be able to access your repository, while your private repositories can only be accessed by you and your collaborators (see Invite Collaborators)
- Description A short description that appears next to your repository’s name where appropriate
- Template Occasionally you may want to generate your repository from an existing template. In that case, you can specify that template here. Otherwise, simply leave this field empty.
- Issue Labels If you want to initialize your project’s issue tracker with a set of labels that you can use to categorize issues, you can choose one here. You don’t have to choose this right away though, as you can choose and modify issue labels at a later time as well.
- .gitignore A .gitignore file defines which files Git should not keep track of. This is useful, for example to prevent configuration files or binaries to be tracked in version control. You can choose to add a pre-defined file matching the programming language you use now, or add one manually later.
- License Here, you can choose from a list of FSF/OSI approved licenses. A
LICENSEfile will then be added to the repository. For some help on choosing the correct license, have a look at our licensing article. - README is the first file one should read when accessing a repository. It’s also the first file displayed when accessing a repository, a bit like the “homepage” of your repository. On Forgejo, this is interpreted as a Markdown file.
- Initialize repository In order to add the
LICENSE,READMEand.gitignorefiles mentioned above to your new repository, make sure you tick this box. - Default branch Using this field, you can choose how to name the default branch of your Git repository. We recommend you use the predefined default.
It’s okay to only specify owner and repository name, if you want to get started quickly. After filling out the fields, click the green “Create Repository” button on the bottom of the page.
You should now see a screen similar to the one below. If you haven’t chosen to generate LICENSE, README and .gitignore the screen might show instructions instead, which will vanish after your first commit.
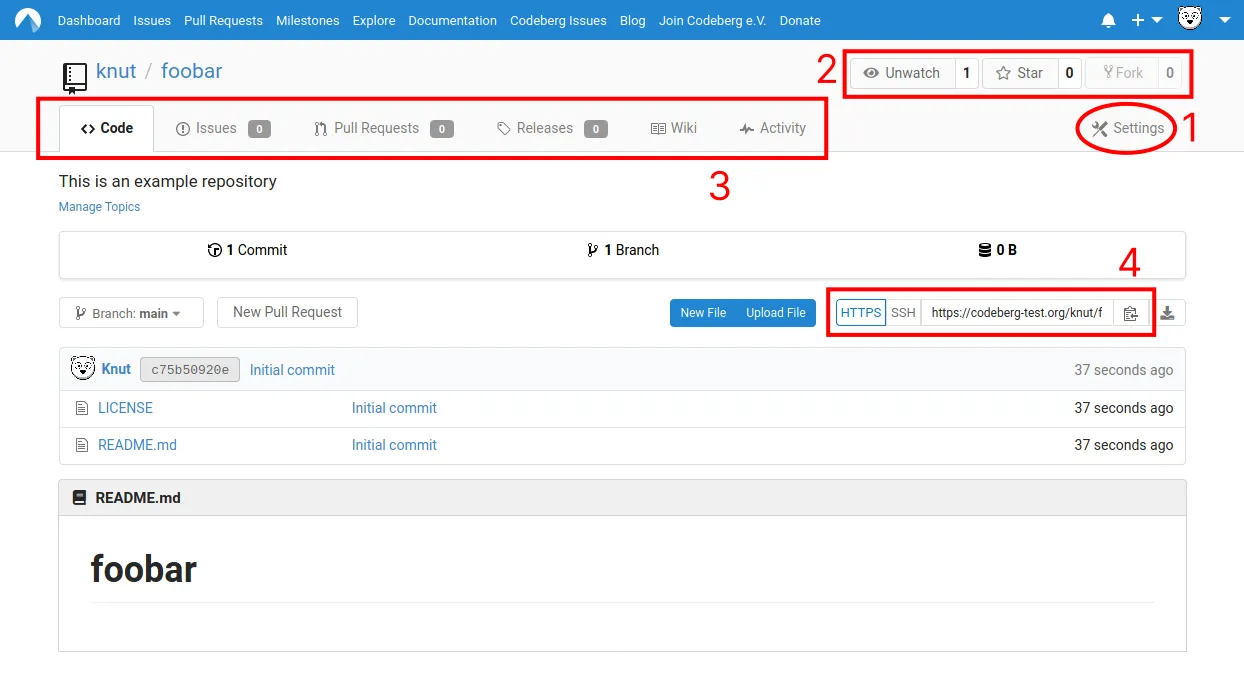
Here’s what the most important buttons do:
- Repository Settings (1) is where you can make adjustments to your repository settings, such as setting a project website, changing the repository description, enabling/disabling a wiki and issue tracker or deleting the repository. You may want to give this page a visit right now, to get an overview of your options.
- The Watch, Star and Fork buttons (2) allow you to interact with other people’s repositories. While they don’t do much for your own repository, when visiting another user’s repository, you can click on “Watch” to get notified about everything important happening in that repository, “Star” to show the user your appreciation (and to help other users find interesting projects more quickly) and “Fork” to create your own copy of the repository, for example to make modifications that you want to share with the original author.
- The Repository Tabs (3) contain links to every important feature within this repository:
- Code lets you browse through all versions of this repository’s code.
- Issues is a very important communication tool between the author, their users and their contributors. Think of it as part bug-tracker, part forum. For more information on this, have a look at The Basics of Issue Tracking
- Pull Requests is where other users can ask the author to “pull” in code, from a fork into the author’s program.
- Releases is a space where the author can upload finished versions of their program, e.g. binaries
- Wiki is a basic wiki feature built into Forgejo.
- Activity calculates statistics about this repository.
- Repository’s Git URLs (4) - use these to let Git know where to find this repository. Don’t worry if you don’t understand this now - we will look at this in the following section.
Connect a local repository to Forgejo
After creating a new repository, as laid out in the previous section, you can now move on to connect the repository with your local development copy.
In this guide, we’ll focus on connecting to Forgejo via HTTP using Git on the command line, but note that there are multiple other ways to connect to Forgejo, as laid out in more detail in the articles:
Although we use HTTP in this Getting Started guide, it is a good idea to setup SSH-based authentication once you feel confident to do so
Option A: Clone the newly created, empty repository
If you want to start a fresh project (so if you don’t already have source code that you want to upload to Forgejo), the quickest way to get started is to clone your newly created repository like this:
1. Navigate to your local workspace (optional)
If you’re just getting started, it’s a good idea to keep your projects neatly sorted in a dedicated directory, like in the following example.
We assume a Linux machine. mkdir creates a new directory, cd changes into it.
$ is indicating that the commands are run as a user without admin permissions.
~/repositories$ is meant to be read as „current working directory is the repositories folder within the home directory”.
The username here is knut on a machine with the name of iceberg.
knut@iceberg:~$ mkdir repositories
knut@iceberg:~$ cd repositories
knut@iceberg:~/repositories$
2. Clone the repository
To clone your newly created repository, execute git clone with the URL that is shown in your repository:
![]()
knut@iceberg:~/repositories$ git clone https://codeberg.org/knut/foobar
Cloning into 'foobar'...
remote: Enumerating objects: 4, done.
remote: Counting objects: 100% (4/4), done.
remote: Compressing objects: 100% (3/3), done.
remote: Total 4 (delta 0), reused 0 (delta 0)
Unpacking objects: 100% (4/4), 11.94 KiB | 764.00 KiB/s, done.

The exact values for size and download speed might differ on your machine.
3. Navigate to the cloned repository
After cloning, the repository should now be in a new directory with the same name as your repository. In this case, it’s called foobar.
The command ls lists all files within the current folder.
knut@iceberg:~/repositories$ cd foobar
knut@iceberg:~/repositories/foobar$ ls
LICENSE  README.md
Option B: Connect an existing local source tree
If you already have written source code that you now would like to upload to Forgejo, follow these steps:
1. Initialize a Git Repository
Unless you already have a Git Repository initialized in your local source tree,
run git init in your project’s directory:
knut@iceberg:~/my-project$ git init
Initialized empty Git repository in /home/knut/my-project/.git/
2. Add Forgejo as the repository’s origin
Now, you need to tell Git where to push your changes. You would do that by specifying Forgejo as a remote.
In this example, we’ll specify Forgejo as the
originremote. You can name your remote any other way, especially if you already have anorigin, butoriginis the recommended name for the main remote repository.
knut@iceberg:~/my-project$ git remote add origin https://codeberg.org/knut/foobarIf all is done correctly, this command should output nothing.
Making your first commit
Now that you’ve connected your repository to your local development copy, it’s time to make your first commit.
If you didn’t generate the
LICENSEandREADME.mdfiles when creating the repository, it’s a good idea to add them now. Just put them in your local development copy’s directory and add them to your commit, as shown below.
1. Create or edit a file
Let’s modify the README.md file.
If you didn’t generate
README.md, these commands will still work fine. However, instead of “Hello World!” being at the end of the file, it’ll be the only line in the file.
knut@iceberg:~/repositories/foobar$ echo "Hello World!" >> README.md
knut@iceberg:~/repositories/foobar$ cat README.md
# foobar

Hello World!
Now, if you now ask Git about your repository’s status, you should see something similar to this:
knut@iceberg:~/repositories/foobar$ git status
On branch main
Your branch is up to date with 'origin/main'.

Changes not staged for commit:
  (use "git add <file>..." to update what will be committed)
  (use "git restore <file>..." to discard changes in working directory)
	modified:   README.md

no changes added to commit (use "git add" and/or "git commit -a")
You can create or modify more files, if you’d like.
2. Add changes to your commit
Next, you should add each modified file that you’d like to add to your commit with git add:
knut@iceberg:~/repositories/foobar$ git add README.mdThis command should output nothing.
If you want to add all modified files in your source tree, you can run
git add .but be careful as this might add unwanted files as well, so it’s a good idea to double-check by runninggit statusbefore committing.
3. Commit your changes
By committing your changes, you create a new step in the version history of your program. They act like snapshots of your program’s state at a given point of time, and you will later be able to jump back and forth between them.
It is recommended to keep commits small and focused, so that, if necessary, they can be reverted or easily adapted into another context without too many side-effects.
To commit your changes, run git commit and specify a commit message; this will later help you (and others) to identify that commit when looking back at your version history.
knut@iceberg:~/repositories/foobar$ git commit -m "My first commit on Forgejo"
[main 1e12979] My first commit on Forgejo
 1 file changed, 1 insertion(+)
If you look at the version history of your program using git log, you may now see something similar to this:
knut@iceberg:~/repositories/foobar$ git log
commit 1e1297929c8c74d9a439fa71c1f0ffe1dbf3d5ad (HEAD -> main)
Author: Knut <knut@noreply.codeberg-test.org>
Date:   Sat Sep 26 14:01:00 2020 +0200

    My first commit on Forgejo

commit c75b50920e3aa7a7ab3484e898fb3ad77132722a (origin/main, origin/HEAD)
Author: Knut <knut@noreply.codeberg-test.org>
Date:   Sat Sep 26 12:29:57 2020 +0200

    Initial commit
The dates, commit hash and author will be different for your project.
4. Push your changes to Forgejo
If you’re happy with the changes you made, the next step is to present them to the world by pushing them to Forgejo:
knut@iceberg:~/repositories/foobar$ git push -u origin main
Username for 'https://codeberg.org': knut
Password for 'https://knut@codeberg.org':
Enumerating objects: 5, done.
Counting objects: 100% (5/5), done.
Delta compression using up to 16 threads
Compressing objects: 100% (2/2), done.
Writing objects: 100% (3/3), 315 bytes | 315.00 KiB/s, done.
Total 3 (delta 0), reused 0 (delta 0)
remote: . Processing 1 references
remote: Processed 1 references in total
To https://codeberg.org/knut/foobar
   c75b509..1e12979  main -> main
Branch 'main' set up to track remote branch 'main' from 'origin'.
It is expected that you won’t see any visual feedback when entering your password. Type it blind and hit return.
The -u option sets the upstream remote, which we want to be Codeberg.org, as configured previously.
The main argument sets the name of the branch onto which shall be pushed upstream. For this example, it should be the same branch name that you specified when creating the repository.
When connecting via HTTPS, Git will ask you for your username and password, which you can enter interactively.
After refreshing the repository page, you should now see something similar to this:
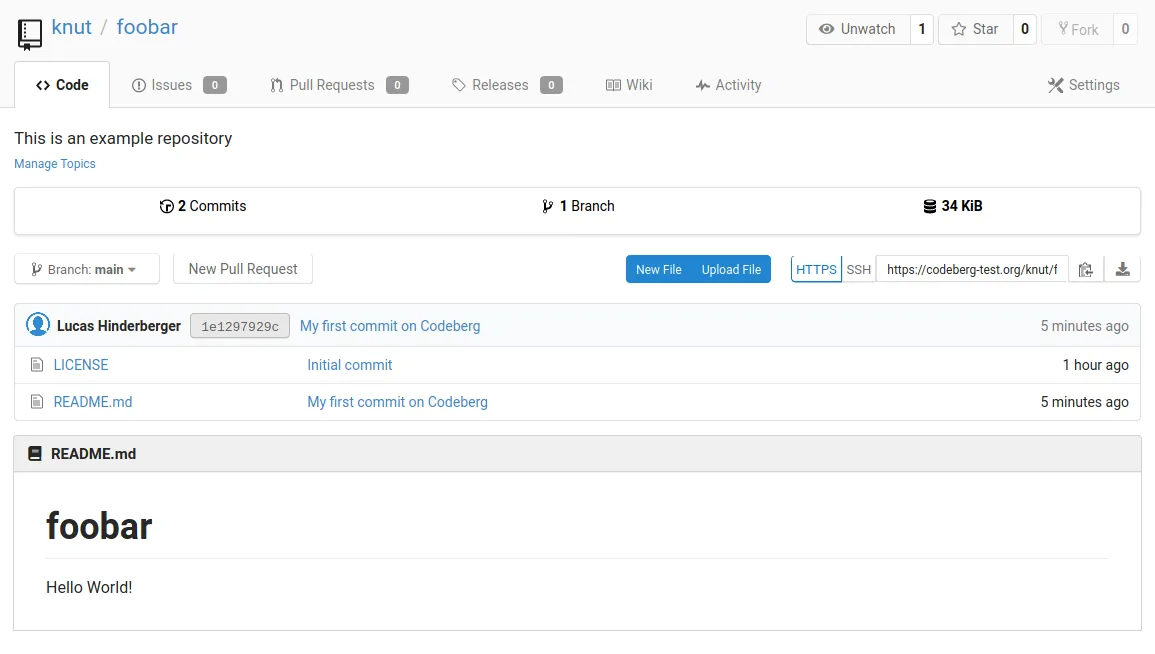
Congratulations - you’ve just made your first source code contribution on Forgejo!